Showing posts with label Fruit Trees. Show all posts

Sunday, August 25, 2013

Starfruit Strawberry Preserves and My First Canning Experience :)


The beautiful starfruit (AKA the carambola)

It all began when my backyard trees were trimmed without proper direction.  My 4-year old son Aiden ran inside to tell me something terrible has happened.  Being the calm undramatic mom that I am, I took a deep breath, braced myself and followed him outside.  He led me to our huge starfruit tree that was in the height of blossoming with almost ripe fruit.  More than half of it's long hanging branches were cut down and huge piles of sad starfruit lay on the ground traumatized.  Although I was just as shocked and upset as my 4-year old, I calmly explained that trees grow better when trimmed properly.  We then both agreed we better save the fruit that fell.  Aiden instructed me to wait under the tree and he ran and retrieved his little red wagon.

We collected 6 wagonfuls of our stranded starfruit.
After collecting all the fruit and organizing them into piles based upon how ripe they were, we needed a plan for what to do with all of this tropical fruit.  Don't get me wrong we love to slice them up into their beautiful star shapes and just eat them as is, although how much starfruit can you eat?  We brainstormed and came up with the idea of preserves.  


NY Girl Preserving by the Seat of Her Pants

Now let me just remind you.  I am a girl from New York that has never experimented or have witnessed any experimenting with canning or preserving.  I love a new food experiment and Aiden is a great sous chef.  My daughter Kaylee was at her first day of school so it was just me, Aiden and our many new canning supplies.

My husband was not happy about all the supplies needed.
I got busy researching the canning process online while I set up my little guy at the kitchen sink on his stool for cleaning duty.  We cleaned and filled our big sink with cool water and he meticulously cleaned each soft fruit.  He loves to do anything with water and he enjoys pretending he is giving the fruit a bath.

The perfect job for little curious hands.

Lots of Prep

I started the sterilization process with big pots of boiling water and felt as if I was in science lab rather than in my home kitchen.  You know something might not be a great idea when your child is telling you to be careful.  After a few near slips of hot glass Aiden decided the scene was a little too stressful and dangerous and holed up in his self-made tent until the boiling water part was over.

Aiden is the king of tent building- his favorite retreat!
Once the jars were ready I had Aiden cut up the starfruit on his own cutting board with a butter knife.  Since the fruit was nicely ripe it was able to be cut easily.  As we were cutting we decided to add some frozen strawberries and fresh lemon juice to the mix.  We added some sugar to the big pot and mixed.  As soon as the mixture hit the heat of the stove top, the house filled with a sweet tropical scent :)

Aiden claimed it looked like snow!

Trial and Error- Part of the Fun of Cooking!

After cooking the fruit mixture down I used a hand-help immersion blender to break up some of the fruit a little more, making sure to leave some whole chunks.  The last step was adding some classic real fruit pectin to create the texture.  Now here is where I think I went slightly off track.  Imagining my beautiful fruit mixture turning into a solid clump I walked on the side of caution with how much pectin to add.  I definitely was shy in the amount as my final product though amazingly delicious was way thinner than I envisioned.

The last scary part of the canning process!
After I cooked the mixture with the pectin for the indicated time I then had to begin the laddeling of boiling hot fruit into the hot jars all while using the sterile technique.  Aiden decided it was time to retreat again but did offer some encouraging words, such as "Watch out Mom".  Let me just say, the canning process is definitely something I could see myself getting better at with practice.

The finished product- seven jars of beautiful preserves.
The finished product was a reddish pink preserves that had a fresh tropical scent.  Although it was thinner than I pictured, it would be delicious on top of pancakes, vanilla ice cream or plain Greek yogurt.  I gave Aiden a taste of the warm preserves before we put them into jars and he described the taste as just like "melted gummy bears".  I guess it was the sweetness and fruity flavor.

Starfruit Strawberry Preserves!

Some important lessons I have learned during my first canning experience is:
  • Canning isn't really for children
  • The amount of pectin needed is an exact science
  • Don't use a pot that is so tall that you need to reach in and risk burning your forearms

Not a Home Run but a Great Success!

As I mentioned, between this last minute idea, having a 4-year old as my sous chef and my first time canning I can't honestly say it was a home run.  I usually can't wait to share my recipes but in this case I think it is in your best interest to visit Ball who offers an amazing and informative website on canning and preserving.  Not only do they thoroughly explain and walk you through the process, but they offer unique and delicious recipes and ideas.  I highly recommend trying this truly classic cooking and preserving process.  My son is very proud to say that he made "jam" and likes to boast about the dangers involved :)  In general, I considered the project as a whole a major success, no major burns, getting to try a new cooking technique, salvaging our suddenly orphaned starfruit, keeping my 4-year old busy for most of the day and having seven jars of beautiful home-made starfruit strawberry preserves to enjoy:)  How could you ask for more?


Tuesday, July 16, 2013

Mangolicious!

I moved out to the country!  Well not exactly the country, but it's all relative.  When we moved from NY to Florida we moved to what they call a "zero-lot line" community.  It basically means you better like your neighbors since there is only 10' between your house and theirs.  Although we were lucky with who we ended up next to, we desperately missed having some privacy and some elbow room.

We looked for an entire year before finally finding what we now call home.  Aside from meeting most of our needs it offered an incredible bonus.  Fruit trees galore!  Oranges, limes, bananas, star fruit and best of all, four mango trees.  If you've ever had the opportunity to see a mango tree you would know what I mean when I describe it as massive.  They have a thick bark with many branches that spread out and create a dense canopy of green leaves.  Mangos started appearing about a month ago as small tight green fruit in clusters and have now blossomed into large greenish/yellowish/reddish heavy fruit.  I have found that if they are not picked in time they very suddenly fall off the tree due to their weight and are usually eaten by whatever night critter is lured by the tropical scent of the ripe fruit.
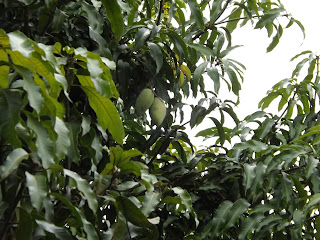
Our mangos slowly ripening on their massive tree!

One of my all time favorite recipes is my mango, avocado appetizer.  My daughter likes to call it Mangolicious!  It's one of the easiest, freshest, healthiest and delicious dishes you can put together in mere minutes and can be assured it will be enjoyed by all.  It only requires 4 ingredients, not counting a small sprinkle of a good salt at the end.

Mango, avocado, lime and cilantro- a winning combination!
The most important part of this recipe is that you use fresh ingredients.  As with any recipe that involves only a handful of ingredients the quality is that much more important.  I thought I would take a minute and review the best way to cut your mango and avocado as I know some people find it a bit intimidating.


Cutting a Mango- I Know You Can Do It!

So, let's begin with the mango.  I'm not going to review the importance of washing all of your produce well since you know that already.  Right?  The first step is to stand the mango on your cutting board stem side down and hold firmly. Place your knife about 1/4" from the widest center line and cut down through the mango. Turn the mango around and repeat this cut on the other side. These 2 pieces are really where most of the "meat" is.  Another option is to invest in a mango splitter which will do this cut for you in one move.  I have not tried this tool yet but am thinking of it now that I have all of these mangos to enjoy.  Next, lay the piece skin side down and with a sharp knife slice parallel lines through the flesh, being careful not to cut through the skin.  Turn the piece 1/4 way around and do the same parallel cuts, creating a grid-like pattern (as above).  You now have two choices to remove the flesh; either scoop it out with a spoon or turn it inside out (as above) and slice off the cubes with a knife.

Slip Sliding Away- the Avocado Seed

On to the avocado!  Lay the avocado lengthwise on a secure surface.  Hold the avocado down firmly with one hand and slowly slice down the center lengthwise around the seed, starting at the narrower end.  Holding the avocado, twist and rotate the two halves apart.  I find the best way to remove the large and slippery seed is to take a chef's knife and carefully bring the knife down on the seed in a quick hard motion so it ends up secured to the seed (see above, as I don't know if you can visualize this description).  Hold the avocado firmly in your hand and twist.  The seed will be pulled out- just be careful when removing the seed from your knife (use a dishtowel).  Another way to remove the seed (as my daughter suggests) is to slip a spoon between the seed and the flesh and gently work the seed out of the fruit.  Once the seed is removed, you can use the same technique as we did for the mango and cut parallel lines through the flesh.  Once you create a grid-like pattern you can take a spoon and scoop out the flesh.


Mangolicious


Ingredients:
1 large ripe mango- any variety that looks best
1 ripe Hass avocado
1/2 fresh lime
A handful of fresh chopped cilantro

Directions:
Clean all produce well.  Cut mango and avocado (see directions above) into small cubes.  Add chopped cilantro and squeeze lime on mixture.  Gently fold all ingredients together.  Sprinkle with finishing salt to taste (I like Himalayan sea salt).  This can be served as a refreshing appetizer with chips (I use kale and chia tortilla chips) or with some celery if you are watching your calories.  It can also be used like a chutney and added to grilled chicken or fish or as a topping for tacos.  Could this be any easier?  No excuses- try it tonight and enjoy!

Servings:  4 (approximately)

What's your favorite way to enjoy a ripe and delicious mango?


site design by designer blogs